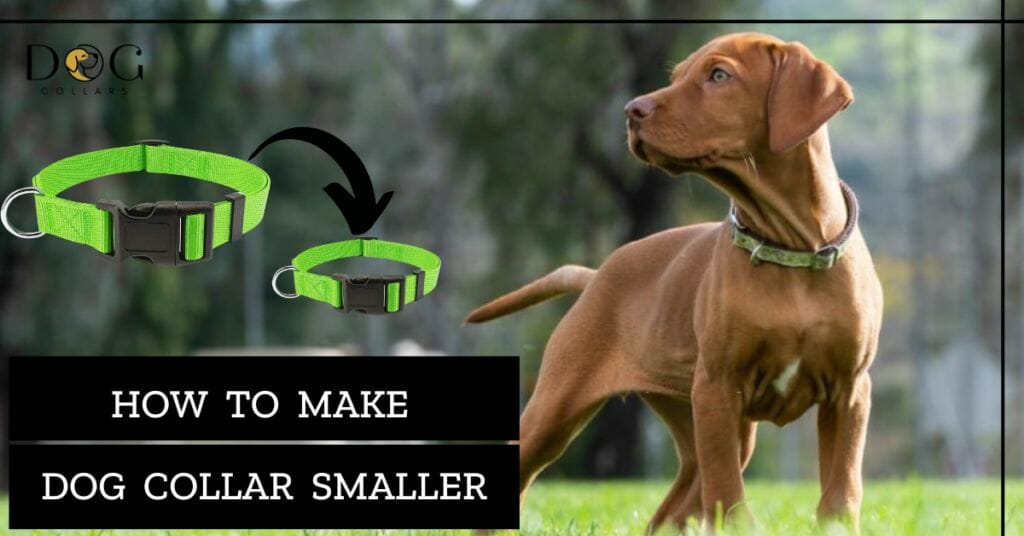
How to Make Dog Collar Smaller – 3 Fundamental Processes
A loose dog collar can be unsafe, as it may slip off and cause your dog to run away or get into an accident.
To prevent any potential danger, it’s important to learn how to make dog collar smaller. Taking a few minutes to adjust the collar can give your dog the secure fit they need for safety and well-being.
As a dog owner, the easiest way to make a dog collar smaller is to adjust the buckle or clip on the collar. Most collars have multiple holes or an adjustable clip that can be moved to make the collar tighter or looser.
Simply find the appropriate hole or adjust the clip to make the collar fit snugly around the neck of your dog without being too tight. If the collar is still too big, consider purchasing a smaller size that fits your dog better.
In this article, we’ll provide step-by-step instructions on how to adjust your dog’s collar so that it fits snugly and comfortably.
Step-by-Step Guide: How to make Dog Collar smaller
Hey there! So you need to make your dog’s collar smaller, right? No worries, it’s actually pretty easy.
You can follow these simple steps:
Step 1. Cut the Stitching
Before you begin shortening the collar, it’s essential to gather the necessary tools and materials. You’ll need a seam ripper, scissors or a sharp knife, a needle, thread (preferably in a color that matches the collar), and some sewing pins.
Start by examining the collar closely to identify where it has been stitched together. This may vary depending on the type of collar you have. Be sure to pay close attention so as not to damage any hardware components such as buckles or D-rings.
Carefully use your seam ripper or sharp implement of choice to cut through the stitching that holds the end of the strap together; this is typically found near where the buckle attaches. Make sure only to remove stitches without cutting into other parts of your pet’s accessory.
As you proceed with cutting stitches, ensure that all threads are removed entirely before moving on to adjusting their length for optimum fit and always remember safety first when handling sharp objects!
Step 2. Adjust Collar Length
Now that you have cut the stitching, it’s time to adjust the collar length.
- Measure the neck of your dog and add two inches to ensure a comfortable fit. Use scissors or a seam ripper to detach the excess material from one end of the collar.
- Thread the collar through the buckle and reattach it using a needle and thread or a sewing machine. Make sure that you sew on both sides of the collar for added durability.
- Check your work by placing it around the neck of your dog. You should be able to comfortably fit two fingers between their neck and the collar.
- If you find that there is still too much excess material after adjusting, repeat steps 1-3 until you achieve the desired length.
Adjusting collar length, not only will it be more comfortable but also safer as it ensures proper control during walks.
Step 3. Optional: Install Electronic Collar Unit
Hey there! So, if you need to switch the electronic unit from your old collar to a new one, here’s what you need to do.
- You’ll want to unscrew the electronic unit from the old collar. Then, use the holes in the electronic unit as a guide to mark the spots on the new collar with a marker.
- You’ll need a wood burner or soldering iron to burn holes in the new collar where you marked them. This may sound scary but don’t worry, it’s actually really easy! The hot metal tool will melt the nylon material of the collar, which will leave no frayed bits.
- Once you’ve burned the holes in the new collar, all you have to do is screw the electronic unit into those holes. And there you have it, your new collar with the electronic unit attached and ready to use!
Remember, choosing the right collar for your dog is crucial. There are many types of collars available including slip collars and martingale collars that may suit different breeds or purposes.
Always measure your pet’s head circumference accurately before purchasing a new collar. A well-fitted collar will prevent them from slipping out or injuring themselves during walks.
By following these simple steps, you can make sure your dog is comfortable and stylish in their new fitted collar!
Looking for the Best dog Collar?
Tell us your dog’s breed and neck size, and we’ll help you find the best dog collar on Amazon!
Best Dog Collar Sizing Chart
For those who are seeking a reliable dog collar sizing chart. The best option available is one that meets the specific needs of the dog’s breed, age, and weight.
Here we have a sizing chart, you may find it helpful.
| Dog Size | Neck Circumference | Recommended Collar Width |
| Extra Small | 7-11 inches | 1/2 inch |
| Small | 10-14 inches | 5/8 inch |
| Medium | 14-20 inches | 3/4 inch |
| Large | 18-26 inches | 1 inch |
| Extra Large | 22-34 inches | 1 1/2 inch |
(Note: These measurements are approximate and may vary depending on the breed and individual dog. It is always best to measure the neck of your dog and consult with the sizing chart provided by the specific collar manufacturer before making a purchase.
A properly fitting collar should be snug but not tight, with enough space to comfortably fit two fingers between the collar and your pet’s neck.)
DIY Adjustable Dog Collar Tutorial: A Fun and Practical Project for Pet Lovers
The increasing demand for custom-made dog accessories has sparked a surge of interest in DIY pet products. Among these is an adjustable dog collar tutorial that utilizes webbing made from nylon or polyester.
Materials Needed:
- Webbing made from nylon or polyester
- Plastic buckle that can withstand extreme pressure
- D-ring for attaching a leash or ID tag
- Sewing machine or needle and thread
- Scissors
Instructions:
- Measure the neck to determine the length of the collar needed. Add an extra inch for adjustment.
- Cut the webbing to the desired length using scissors.
- Insert the webbing through the plastic buckle and fold it over itself, making sure it is securely in place.
- Sew the webbing together using a sewing machine or needle and thread, making sure to reinforce the stitching for added durability.
- Attach the D-ring to the collar by sewing it onto the webbing.
- Test the collar’s fit on your dog, making any necessary adjustments.
Benefits of a DIY Adjustable Dog Collar:
- Provides flexibility and easy adjustment to fit the needs
- Allows for a personalized style and unique touch
- More cost-effective than store-bought options
- Satisfaction in creating a product tailored to your pet’s specific needs
Tips:
- Ensure the webbing is the correct width for the plastic buckle to securely hold the collar in place.
- Sew the webbing securely to prevent fraying or unraveling.
DIY adjustable dog collars are a fun and practical project for pet lovers. Whether done as a hobby or a business, pet owners will undoubtedly find satisfaction in creating personalized accessories to suit their beloved canine companions.
Conclusions:
We hope this article has been useful in helping you make your pet’s collar smaller and more comfortable for them. With the right materials, it can be done with relative ease.
Just make sure to take measurements before cutting any material, so that you don’t end up with a collar that is too small or too large for your pup. And if all else fails, remember that there are lots of amazing pet stores out there that will happily help you find the perfect-sized dog collar for your fur baby.
FAQs:
How can I make my dog collar fit better?
Once you know the size, adjust the collar so it fits comfortably around the neck of your dog without being too loose or too tight. It’s important to make sure you can fit two fingers between the collar and your dog’s neck. If the collar is still loose, you can tighten it accordingly. This will ensure your dog is comfortable and safe while wearing their collar.
Can I shrink a dog collar?
It is possible to tighten a dog collar, but it is not recommended to shrink it. Shrinking a collar could cause it to become too small and uncomfortable for the dog. Instead, it is best to adjust the collar to fit the dog properly using the adjustable straps or to purchase a new collar that fits correctly.
Do collars damage dogs’ necks?
There is a debate on whether collars can harm a pet’s neck by pulling on their muscles and spine. However, some believe that collars are safe if used correctly and fitted properly to the dog’s neck size. Alternatively, a dog harness can be used to distribute pressure to the chest and shoulders instead of the neck. It is crucial to choose the appropriate equipment for your dog.
Do dogs feel better without a collar?
It depends on various factors such as the material of the collar, duration of wear, and the individual pet’s temperament. Collars made of harsh materials or left on for extended periods can cause discomfort, irritation, or even injury.
However, collars can also provide a sense of security to some dogs, and their absence can cause anxiety.
Is it bad to walk a dog with a collar?
It is not inherently bad to walk a dog with a collar. But it’s important to choose the right type. Leather collars are popular because it’s more comfortable on the neck of the dog and less likely to cause irritation or injury.